Successful traders treat trading like a business and part of treating your trading like a business involves keeping a journal. While everyone has a different format and preference, I generally use an Excel spreadsheet to help with calculations and provide organizational clarity.
Crypto investors are always curious about each other’s positions and typically these conversations take place in private DMs and telegram chats. The goal here is to provide some transparency on my trading routine and I hope traders find the process of observing each step of every trade educational.
Trading position sizes are redacted, but they are always calculated based on a 1% portfolio loss using the stop loss and entry as a guide.
Chainlink (LINK)
Entry: .00016499 Satoshis (sats)
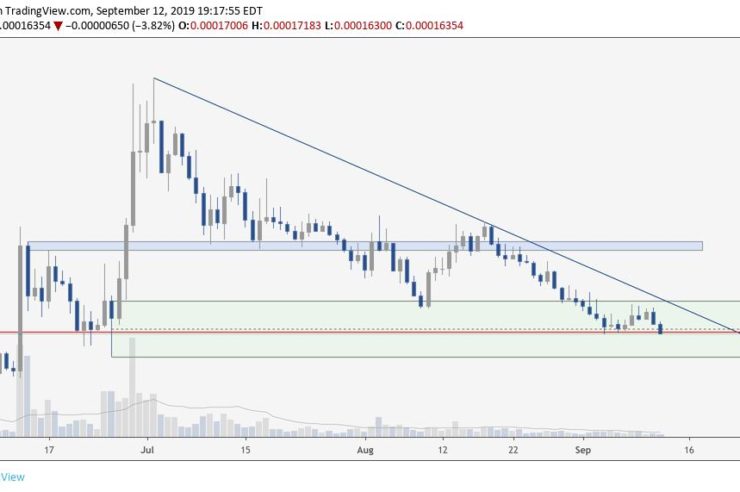
Targets: .00018564 (sats) for an 11% gain near the top of weekly demand zone and .000224 (sats) for a 26% gain near the bottom of blue resistance (see chart).
I’ve placed a stop loss at .00016064 (sats) which equates to a -2.6% loss.
It’s also good practice to consider the risk to reward ratio when making an investment, especially with altcoins given Bitcoin’s current dominance rate. The risk to reward ratio measures the difference between a trade’s entry point all the way to the stop-loss and sell or take-profit order.
Comparing these two provides the ratio of profit to loss, or reward to risk. For this trade, it is roughly 4.5 at first target 12.6 at the second target.
As mentioned earlier, position sizes are redacted and each trade exposing the total portfolio to a 1% risk.
9/13/19
General analysis
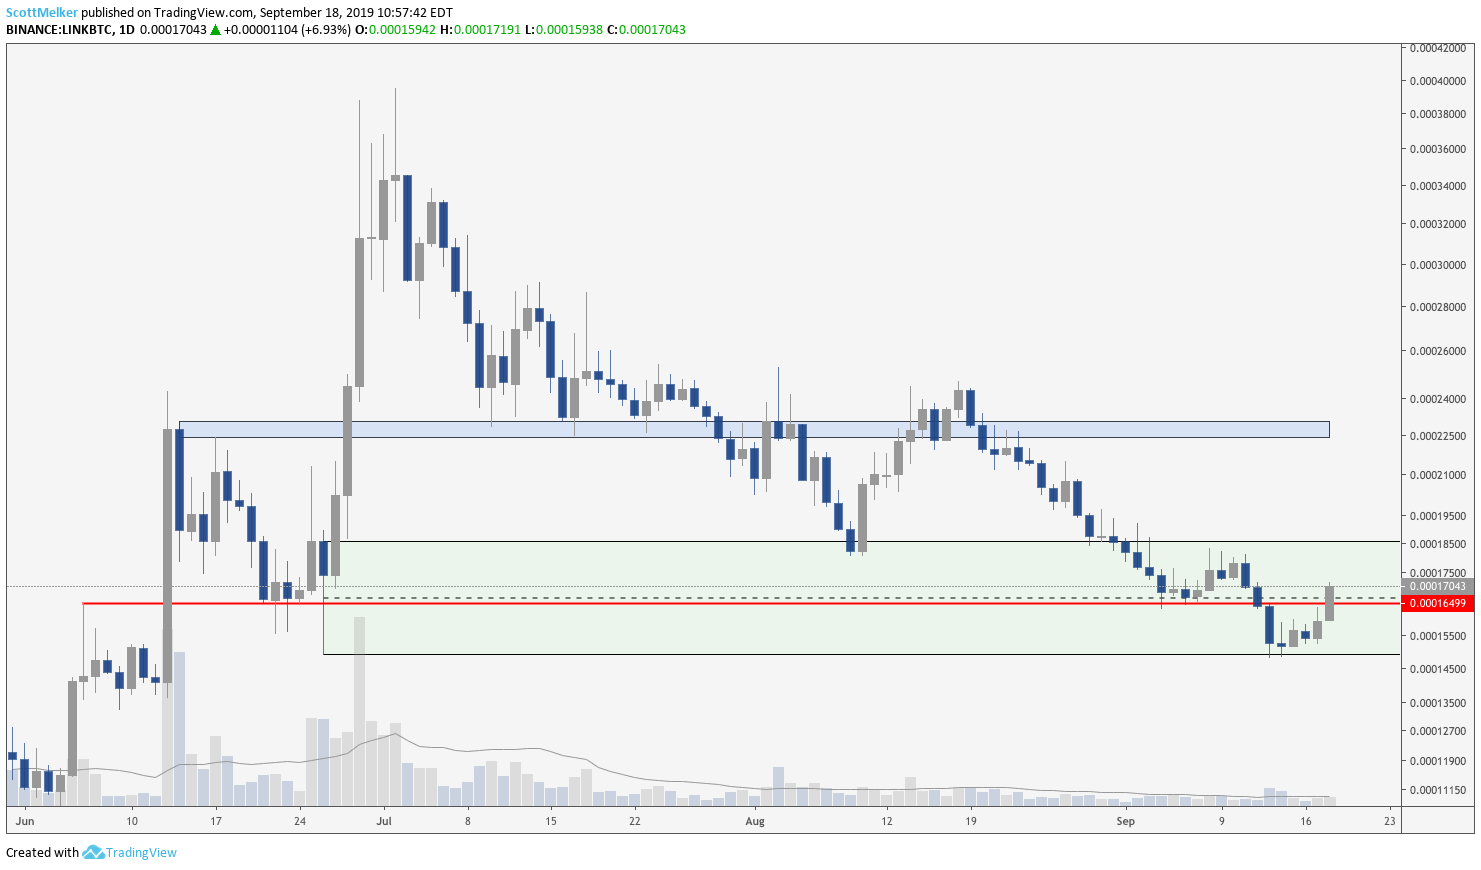
LINK caught my attention on Sept. 9 as it was in a clear corrective downtrend since hitting an all-time high. The blue zone was providing strong support and was effectively the bottom of a descending triangle. LINK price broke down from this zone and retested it a number of times as resistance before moving away.
The altcoin then bounced off of the key support at .00016499 (sats) and eventually broke down, which became my first area of interest to trade. The green zone was an area of daily demand (.00014863 to .00018564 (sats)) and a break below this would be bearish, and likely lead to further price depreciation.
LINK/BTC Daily Chart. Source: TradingView
Entry ideas
If it breaks down here, the first interesting entry would be a breakthrough .00016499 (sats) which would recapture the former support. Ideally one would like to catch a retest, but being willing to potentially trade the breakout with a tight stop was the thought, as LINK tends to really move and punish traders waiting for a clean retest.
In hindsight, I wish I could have shorted this down as I was very confident that price would drop after losing the blue zone.
If LINK price broke the descending trendline it would be something of a definitive end to the downtrend. A break or retest of this area would become a second trade.
How it worked out
By Sept. 19 the trade proved to be a success. There were 2 consecutive swing failure patterns (SFP) below the previous swing low at the bottom of the green range with tweezer bottoms on the daily chart.
Swing failure patterns are identified when price quickly moves to a key swing low (or high for a short), wicks below and closes above. This is an indicator that a whale has pushed price to that level to find liquidity to fill their orders and often referred to as “engineered liquidity.”
LINK/BTC Daily Chart. Source: TradingView
This was interpreted as a strong reversal signal and was a sign that LINK was about to pump. A full position buy order fired as price broke through the red line and as mentioned before, I chose to play the break out with a preset limit order.
Sell orders had been set at .000185 (sats) (50%) and .00022 (sats) which was the remaining 50% of the position. I’ve found that putting sell orders lower than the targets helps to avoid being front-run and this is a strategy I employ with all my trades.
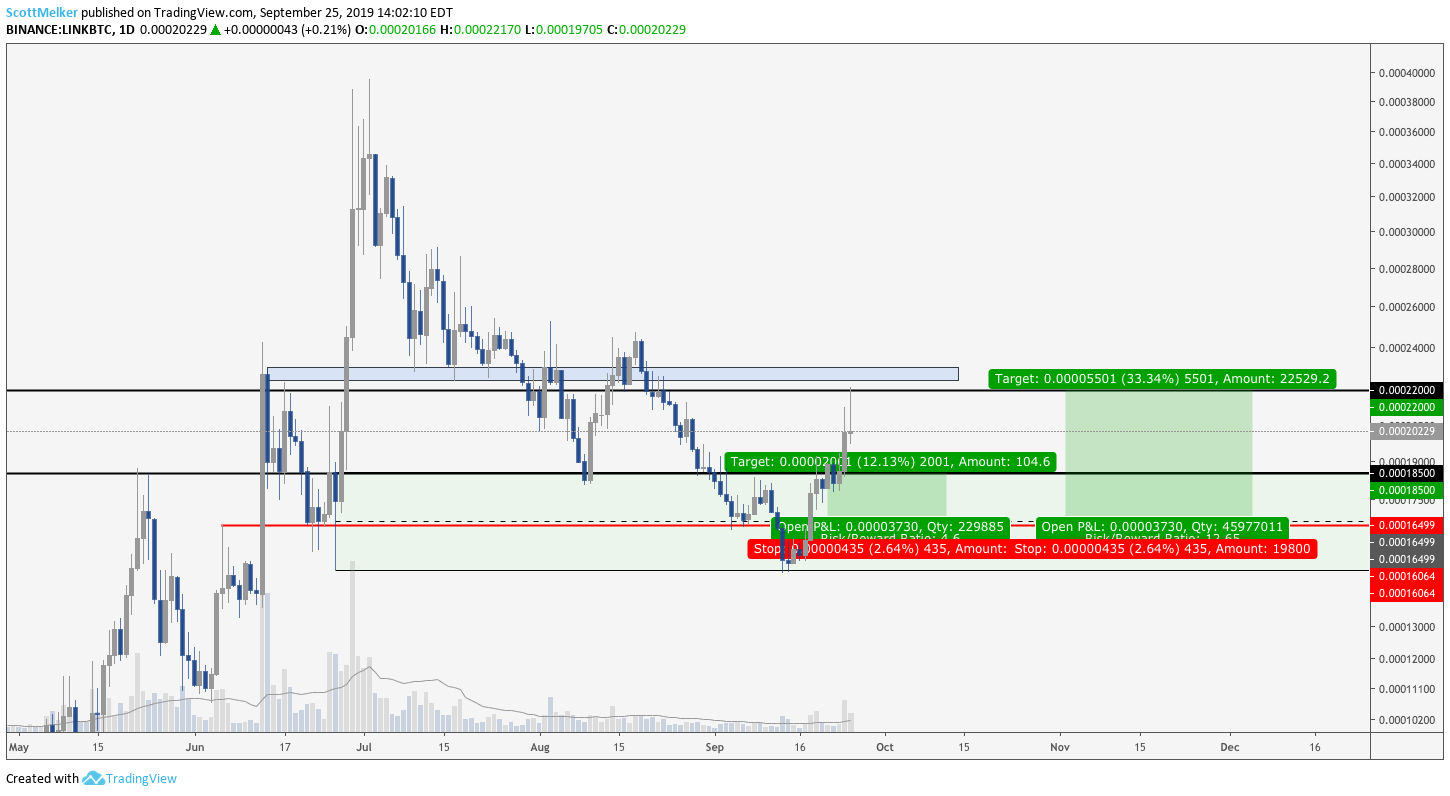
LINK/BTC Daily Chart. Source: TradingView
Overall the trade went great. Both targets were hit and closed 50% of the position at each target. LINK appeared to have more gas in the tank but I chose to stick to the plan.
I wasn’t looking for re-entry at this time but I would consider a re-entry with a retest of the red line, or a break of the descending line mentioned earlier. This trade produced an 18% profit.
Bitcoin (BTC)
Since topping out at $13,800, Bitcoin (BTC) has been on a bit of a roller coaster but this doesn’t mean intraday and swing trades can’t be capitalized on. My targets were set at $9,700 through $10,028 and idea entries were at $9,367 and $9,321.
The risk to reward was 3.1 for the first target and 11.5 for the second target. A stop-loss was placed at $9,260 which equates to a 1.14% and 0.65% loss if that region is hit.
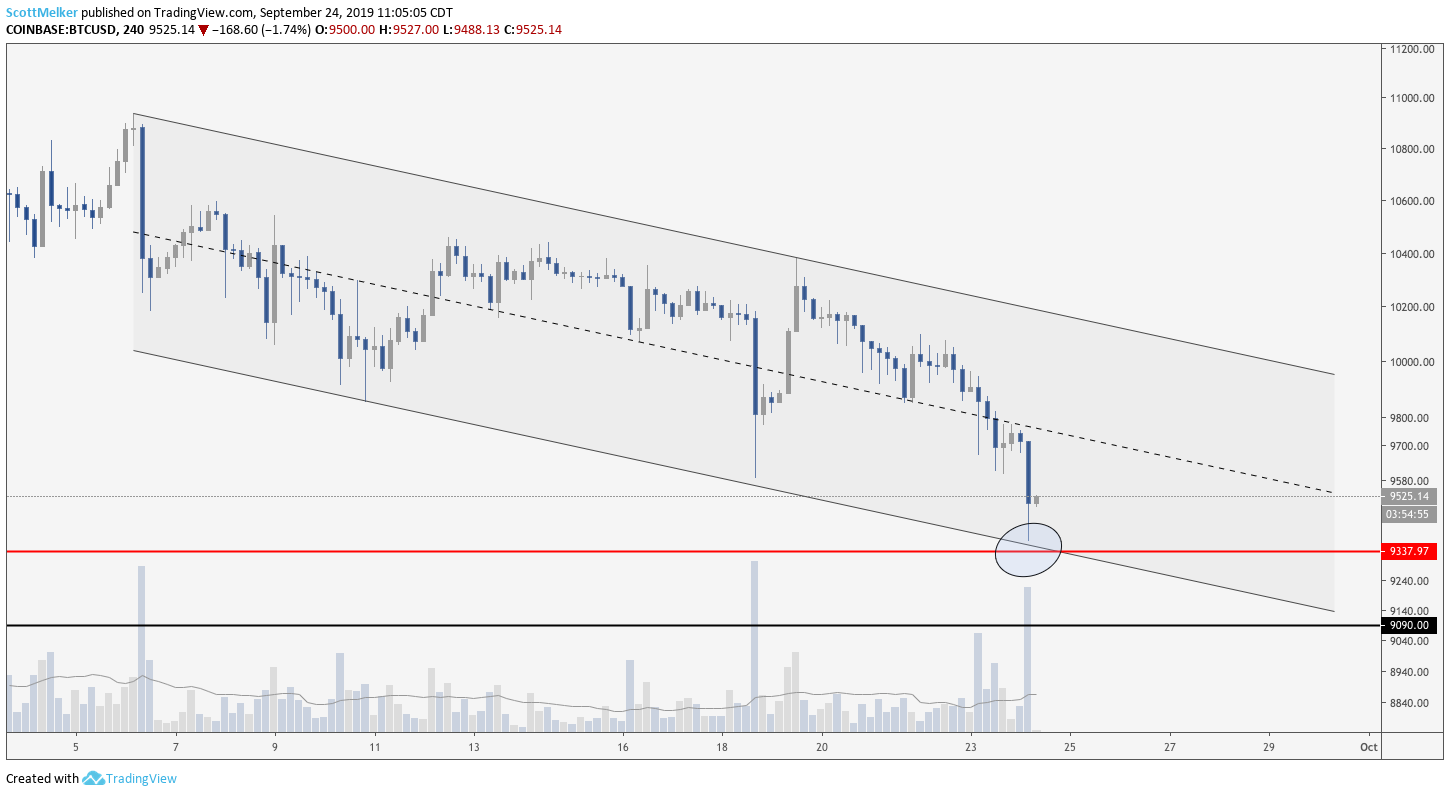
BTC/USD 4hr Chart. Source: TradingView
General analysis
I chart Bitcoin (BTC) more than any other asset, so I am well tuned to its general movement. Importantly, as an American, I do not trade on any leveraged exchange since I don’t trust them. This means I lack the ability to short even though Kraken readily available. I simply don’t trust the availability of margin or the “scam wicks” that are often seen liquidating and stopping out unassuming traders.
Bitcoin price has been slowly dropping for days and around Sept 24 it looked ready to fall off of a cliff. That said, there is a very good risk/reward for a long if this is the bottom but one would need a tight stop.
This is a clear situation of “buying support.” The only issue is that the support has been tested multiple times which tends to make it weaker. The closer to support the better entry to tighten up the stop loss. The channel is also unconfirmed at the bottom and the resistance at the top is clear.
The red line represents a previous swing low and I want nothing to do with any candle closes below this line because it will clearly invalidate my premise.

BTC/USD 4hr Chart. Source: TradingView
Entry idea
The confluence of a key support from the previous swing low ($9,321) and the bottom of the potential channel represents a do or die point and it is very easy to cut bait with a tight stop if this goes the wrong way.
The risk is having a stop loss fire and this level turning into an SFP with just a wick below the red line. That would be brutal and has happened many times. Setting the stop at $9,260 gives about $60 of leeway below the support for an errant wick.
I decided to spread the orders in a circle and the first wick down filled about 70% of the orders and was followed by a nice bounce. I thought that may have been the end of the dump there, but the rest of my orders filled at the red line.
Not ideal, I would have rather had the orders all fill on the first drop. The fact that the price bounced and returned to support is bearish but I am sticking to my plan.
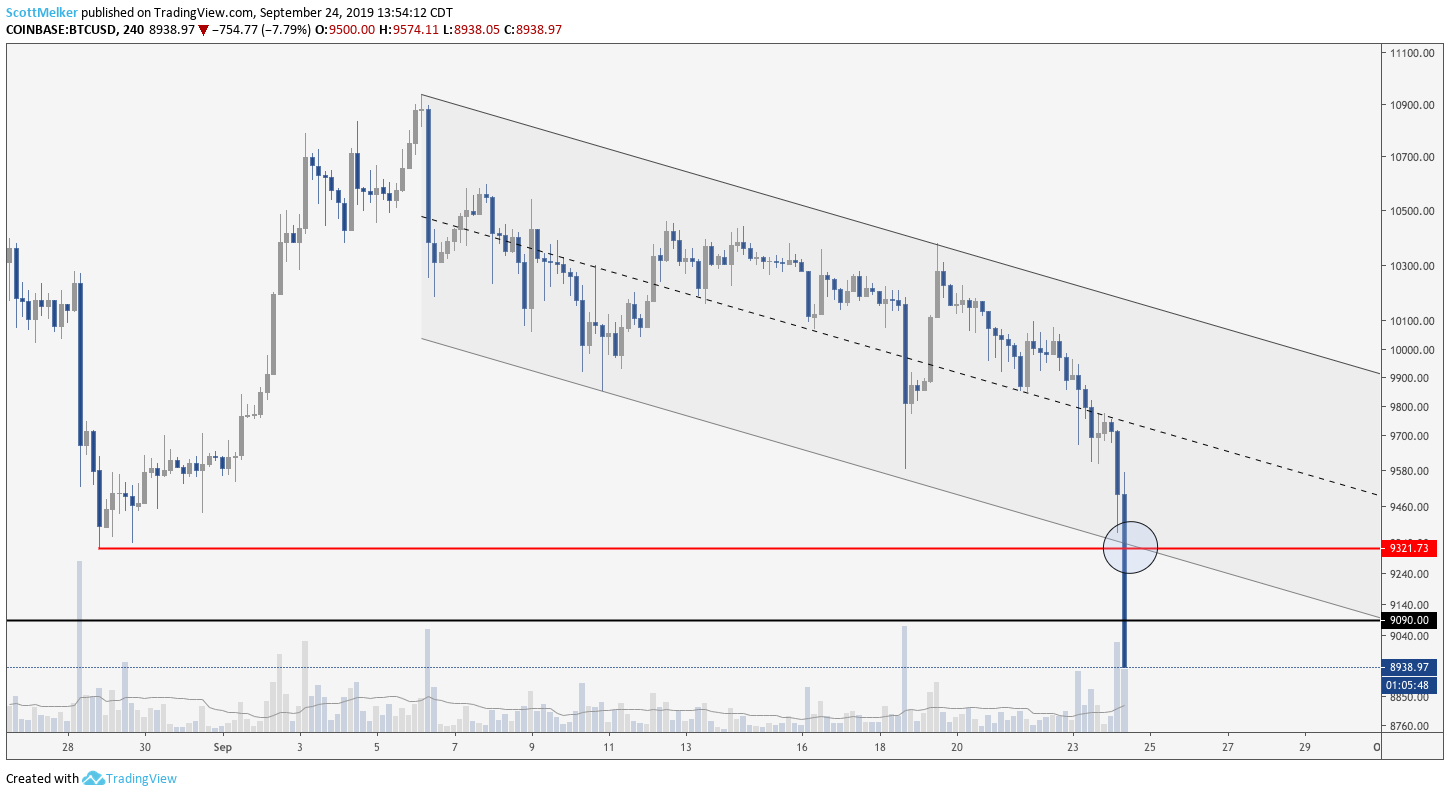
BTC/USD 4hr Chart. Source: TradingView
How it worked out
The trade was a total train wreck. That was the fastest that I have been stopped out of a trade in a long time, probably under 5 minutes from the second entry. Bitcoin price hit the red line and dumped through it in epic fashion.
Clearly this was an absolutely awful read on the chart, but luckily a tight stop loss helped to mitigate losses. This would have been extremely ugly without a tight stop, as it ended up being one of the largest red candles in recent Bitcoin memory. This trade led to a loss of 0.9%.
One thing that can be taken away from this experience is that keeping a journal allows a trader to backtest and review candle patterns and support / resistance levels without confirmation bias. This improves the ability to execute and manage future trades.
The views and opinions expressed here are solely those of the (@scottmelker) and do not necessarily reflect the views of Cointelegraph. Every investment and trading move involves risk. You should conduct your own research when making a decision.



Comments (No)